
Looking for a gift you can handmake for Mum this Mother’s Day? Look no further! CW has found five cute, easy, and sustainable crafts that the kids will love to make themselves.
Handmade topiary cards
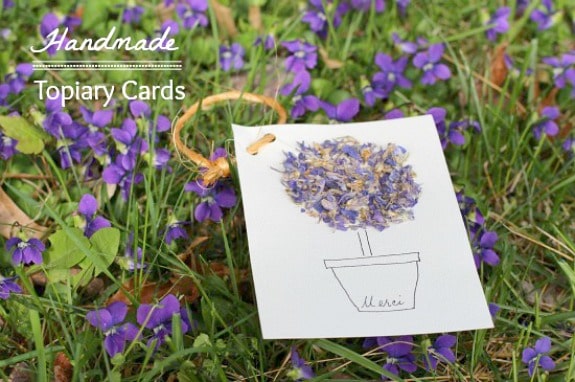
This simple yet stunning craft is the quintessential Mother’s Day gift, incorporating two things most mums love: cards and flowers.
What you’ll need:
- Dried flowers
- School glue (such as Elmer’s)
- A fine tip ink pen
- Card stock paper or blank notecards
- Jar lid round (as the stencil for the topiary head)
Step 1: Cut the paper to your desired size. Place your jar lid round in the top section of the paper (arranged vertically). This round area will obviously be the top of the topiary plant design.
Step 2: Smear glue on the paper in the inside of your jar lid round, holding it firmly in place then remove to form a perfectly round circle of glue.
Step 3: Sprinkle your dried flower petals onto your circle of glue. Shake the card to remove the excess petals and you have now created the top portion of your topiary plant.
Step 4: To make the trunk, draw two thin vertical lines. Start drawing the pot by making two thin vertical lines (forming a long thin rectangle) underneath the trunk.
Step 5: For the base of your planter, draw diagonal lines that angle inward at the bottom, then lastly a horizontal line on the base to form the bottom of the planter.
Step 6: Write ‘Happy Mother’s Day!’ inside the planter or anywhere on the card.
Step 7: Punch holes in the top of the card if you want to hang it on a gift and tie ribbon or twine in a loop.
*Craft from makeandtakes.com
Hand-dyed napkins
These hand-dyed napkins are the perfect addition to a Mother’s Day lunch with the family, and are so easy to create!
What you’ll need:
- Cotton napkin
- Fabric paint
- Paint brush
- Iron
Step 1: Soak a cotton napkin in water (or run it under the tap). Wring out excess and lay on a covered surface.
Step 2: Starting at the bottom, brush on fabric paint. Add more water, a few tablespoons at a time, to dilute paint as you move up.
Step 3: Hang and allow to dry overnight.
Step 4: Iron fabric to set paint.
*Craft from www.goodhousekeeping.com
Heart-shaped salt dough hangers
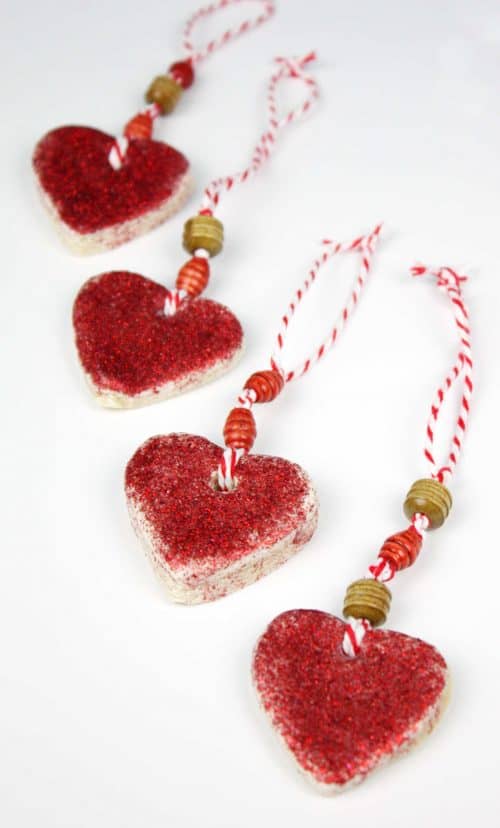
Pop these around the house as decoration. They will look divine in a window casting a sparkling glow!
What you’ll need:
- Salt dough (you can find recipes online)
- Heart-shaped cookie cutter or a heart template
- Red glitter
- Mod Podge or glue
- String or twine
- Beads
- A drinking straw (or anything that will make a hole)
Step 1: Once you have made your salt dough, roll it out to about 0.5cm thick.
Step 2: Using your cookie cutters or a heart shaped template, cut out your hearts.
Step 3: Add a hole to the top of the heart – using a straw is the easiest way.
Step 4: Leave them to dry for a day or two.
Step 5: Layer on the Mod Podge and then sprinkle glitter onto the top.
Step 5: Once dry, add the string then the beads to the string.
*Craft from emmaowl.com
Lemon bath salts
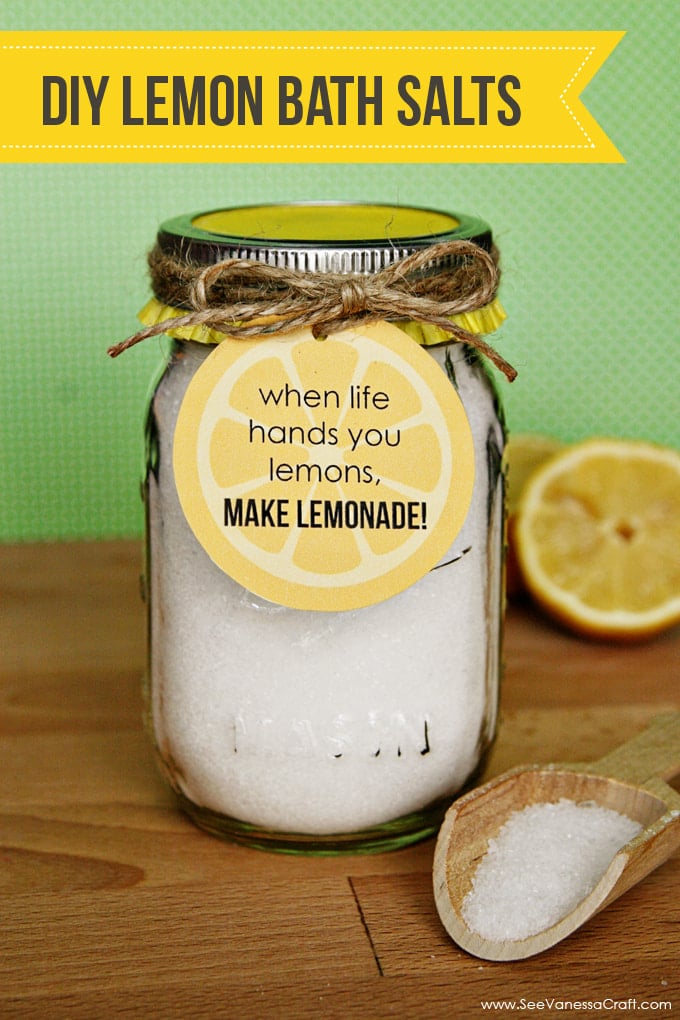
When mum needs a moment to herself to relax and re-coup, what better way than a soak in the tub with some lemon bath salts?
What you’ll need:
- Mason jar
- Epsom salt
- Lemon essential oil
- Yellow cupcake liner
- Twine/string
Step 1: Pour Epsom salt into the mason jar, leaving 1/2 inch of room at the top with the lid on.
Step 2: Pour 10-15 drops of lemon essential oil into the jar, place the lid on and shake to mix.
Step 3: Place a yellow cupcake liner under the rim of the lid and screw onto the jar.
*Craft from seevanessacraft.com
Ladybug mug
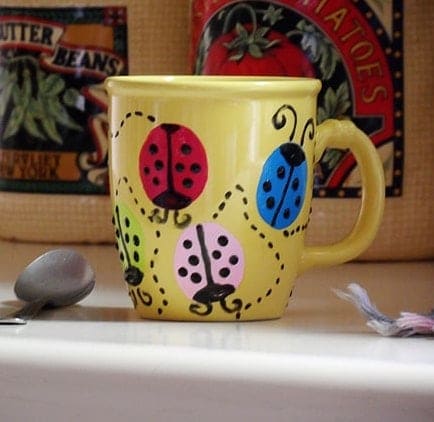
This fun and easy craft project is colourful and utterly cheerful. Mum will cherish it forever!
What you’ll need:
- Plain ceramic coffee mug in white or a light colour
- Enamel paint
- Paper plate
- A round pouncer (sponge stippler)
- Black 3D gloss enamel
Step 1: Make sure your mug is nice and clean and dry. Avoid touching the surface of the mug with your fingers if you can.
Step 2: Squeeze out some enamel paint onto a paper plate. Swirl the round pouncer into the paint to load it up.
Step 3: Apply paint to the mug with the pouncer, using a swirling motion. If it bubbles, gently brush across the bubbles with the edge of the pouncer. Repeat with all the colours.
Step 4: Use the 3D Gloss Enamel in black like a pen to draw on the heads, antennae, dots, and the line down their backs. Carefully dot on “flight trails”.
Step 5: Put it somewhere safe to dry for 48 hours, then you can bake it according to the directions on the back of the paint bottle.
*Craft from craftsbyamanda.com
Canberra Daily would love to hear from you about a story idea in the Canberra and surrounding region. Click here to submit a news tip.

